|
RD/TZ/LC/RZ PORTMAPS PROJECTS DRAG RACING |
RD/RZ Reedcage Modifications
| As you increase performance in RD250,350
and 400’s this is the basic order I take:
Stock/Unmodified Reedcage So there’s “basically” three options: The next step up would be: Modifying RD/RZ Reedcages
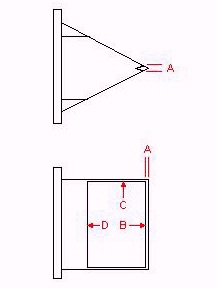
2 Strokes need to move alot of air through the reedvalve quickly. The easiest way to get the most air soonest (the quickly part) is to have alot of reed opening area at the very tip of the reedcage so that theres higher flow as soon as the reed opens (lower reed lifts).Since the majority of the action in a reedcage is at or starts at the tip thats were I start. more airflow at lower reed lift is accomplished by moving the reed opening forward to within a mm or 2 of the tip this not only makes the reed opening longer but makes "A" thinner less of an obstruction. blend & shape towards the back "B" but do not knife edge, knife edges are for knifes not for 2strokes. Next smooth the sides "C" for a little more width & less turbulence but leave at least a mm for sealing. Next narrow the bridge, 4mm is fairly safe, 3 less safe. Modifying the back of the reed opening "D" has the least effect due to the low reed lift there but is sometimes necessary. I use small fiber cut-off wheels & standard burrs for the rough work & an assortment of files & sandpaper for finishing. I’ve never had the opportunity to experiment with the the angle of the horizontal divider but Tony Doukas of Tony Doukas Racing had this to say about it. “By changing the angle of the center divider that splits the cage top and bottom (The horizontal divider) you can alter the airflow so it pushes the reed petal at different angles. A steeper angle will give more bottom response but affect flow at high engine speeds. A shallow angle will have less bottom end and create more flow at higher RPM's. This is the normal angle we use as the Banshee engine it a mid to top end engine.” In higher output RD400s removing the bridge & using single petal YZ85 reeds or "TDR" (Biases top end) works great. The next step up would be: The next step up would be: RZ Reedcages Modified RZ Reedcages On RZ350 reedcages because theirs not much airflow at the rear of the reedcage opening just square off the openings and concentrate on narrowing the bridge and working on the front and sides of the reed openings increasing the airflow where it's most effective Removing the bridge will work on the RZ cage but I don't unless it's
absolutely
necessary as it can cause a bit of an upset at lower rpms. I don't recommend it, but if you have to
don't move the reed openings back or square off the outer rear corners of the reed
openings. This will give you about as much support as you can get without the
bridge.
Moto Tassinari V-force Banshee Reedcages
TZ750 - RZ350 Reedcages
A good intake modification for the RDs is to use RZ350 intake manifolds with stock modified RD reedcages which allows you to use a boost bottle or crossover tube & still retain the stock reedcage. Since the bolt pattern is the same all you need to do is cut the 'ears' off the RZ manifolds that would fit into the RZ reedcage flush. Then put the manifold up against the RD reedcage & mark the difference in the openings on the cage, remove the manifold & cut there to match the two.
ReedCage Spacers Spacers between the reedcage & the cylinder can be beneficial & are used to 1) unshroud the boost port when the airpath is obstructed or poor by design or when necessary when the boost port has been modified 2) Used to help in fitting a larger reedcage or 3) To increase crankcase volume.
Installing RZ reedcages into an RD This is a common performance mod but 2 things first. 1) do you really
need it? I've personally put 70 rearwheel roadracing hp through modified RD reedcages. 2) It's time consuming. If you decide to do it be careful & take
your time & you can do this a hundred times or rush & you'll hit
daylight. Start by putting dykem on the face of the cylinders reed gasket
surface & using the mounting hole threads as a guide mark as shown those
limits have personally never let me down. now put the spacer you'll be using on
the reedcage & measure from the face of the spacer to the tip of the cage
measure that far into the intake & mark it 'all the way around' that way if
you wipe out the marks on the sides you can still judge by the top & bottom
marks. Then measure the reedcage tip & set an inside divider to that width,
you'll port from the marks at the sides of the intake gasket surface to that
width at the other marks you made inside the intake port. Now blend it in up to
the liner. Then comes the fitting. |